Showing posts with label preschool. Show all posts

Monday, November 18, 2013

Sheep lesson and yard dying tutorial


This week we have been learning about sheep we started talking about the fact that sheep provide wool that we use for sweaters, hats, socks etc. After getting trapped in the rabbit hole of YouTube videos of the whole process (hearding, sheering, spinning, dying, creating) I thought it would be a neat idea if we could find a place locally that we could maybe watch hand spinning or try our hand at dying since I have never attempted to do this before. Well I stumbled upon what I believe to be my new favorite local store Puffy Mondaes , ceramics, cloth diapers, and any type of yarn you could imagine and yes they even teach spinning all wrapped up with the kindest workers. The owner spent a great deal of time explaining a kid friendly approach to dying a small amount of yarn. Here's the method I tried: *note non of my measurements were very exact and we still had great success. **

1. Purchase your yarn (it must have at least 30% wool in order to grab the dye) the higher the wool percentage the higher the pigment. We used 100% wool,  dye, we used this brand in royal blue, gloves, vinegar, cling wrap (optional) something to protect work space, and a microwaveable dish and something to pour or submerge your yarn with.

2. I heated up a big pot of water with about 1/4 cup of vinegar (didn't boil) and submerged your yarn ensuring that you wet the whole roving. Once wet I pulled it out with a pair of tongs and placed it in a bowl with a towel inside to try to take most of the excess moisture away. Carefully try to squeeze extra moisture (this is super hot) 

3. I used the remaining water from the pot to mix my dye (this is where the kids come in) it was about 5 cup, I added a few more tablespoons of vinegar (note you don't have to use the same water but you have to make sure that your water is warm as well to avoiding felting) This dye is very pigmented so I used a little less than 1/4 teaspoon for that amount of water. 

4. Mix


5. Here comes the fun part. I couldn't find any of my squirt bottles so we used two old baby bottles with old nipples. I cut the tip of them to make the flow bigger. 


6. Pour your dye and have fun. Make sure you flip over to ensure that the whole yarn is dyed (it doesn't have to be perfect) using gloves rub dye in well.


7. Once your happy with the results you can roll your tube of yarn in cling wrap (think roll of cookie dough) I didn't have cling wrap so I skipped this step. Roll your yarn into a cinnamon bun shape and place inside your microwavable dish.

8. Microwave on high for 4 minutes, take out and let sit for 2 minutes. Repeat again.

9.  Take out and let cool (careful it's super hot).

10.Once cool rinse well.   You can let your yarn cool an hour and use warm water or cool over night and use cold water. (Again the key is to make sure your water matches the tempeture of the yarn to avoid felting) Rinse until water runs clear. We waited for a few hours so the boys could help rinse without burning themselves. 

11. The killer..... let air dry. This took two whole days for us.

12. Roll your yarn and enjoy!!!! I think we will be using this for cowl scarves for the boys. 

This by far was one of the most fun things we have done in a long time and I am already looking forward to doing it again. These would great to knit or crochet something for family members for the holidays. Especially since the boys can help with the process. 


Thursday, September 26, 2013

family and home {art}


Since we have been on the subject of families this month we touched on the idea of homes. Where we live, what does our house look like, in our case what did our last house look like as well, who lives in our home and what are things that we do in our home
I set up this easy art idea after our morning circle time. I used a set of family shaped math sorters and
foam blocks . I set up our family and built a simple shaped house on the side. I cut out different shapes out of varies colors of construction paper. One blank sheet of paper and a glue stick was given to each of them.

With W my main objective was for him to identify our family with the sorters (which one is baby, which one is mama?...) and while gluing identify shapes and colors. With B I did all the above but also had him identify and glue the shapes he saw more intentionally. (a triangle on top of a square for the house etc.) I still allowed him to glue it on his own so it was still his own creation. The results were fun, colorful shaped art pieces that the boys are eager to talk about,  letting me know what shape is which member of our family.

While they dried we pulled out the rest of the blocks and sorters and the boys spent the rest of the morning making families and homes with them. Speaking of family, in case anyone is ever curious of what goes on while the boys are doing all this stuff. Here you go, 9 times out of 10 I am holding this baby and my camera. Check our that double chin in all its glory.

Tuesday, September 17, 2013

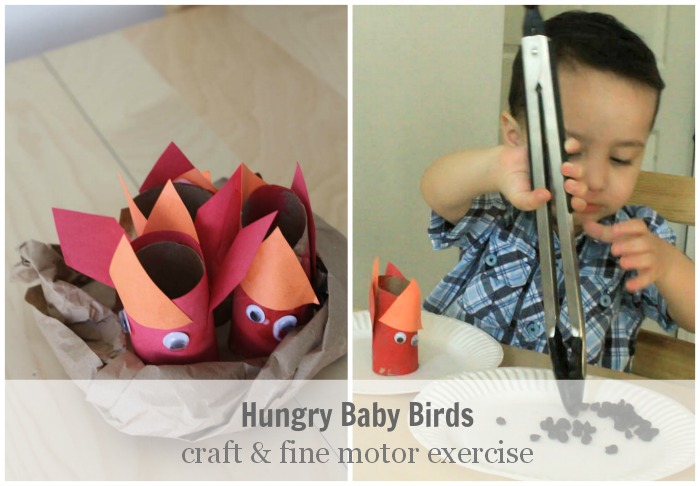
Hungry Baby Birds


This week our main focus has been birds and their families. It tied in great with both Brown Bear, Brown Bear as well as the topic of family. We discussed how baby birds are dependent on their parents for food, and shelter much like they rely on us for the same thing and how the Lord has given us (as parents) the job  to protect them and care for them. They have been especially fascinated with how both parent birds feed their babies. I found THIS book at the library and it was a perfect fit. I decided I wanted a craft that would replicate a baby bird with an open beak.

Here's what you need

  • toilet paper roll
  • googly eyes
  • two orange construction paper triangles (beak)
  • two diamond shaped construction paper cutouts in whatever color you chose (in our case it was red)
  • paint (for bird body)
  • glue
1. first color your whole roll whatever color you would like your bird to be (allow to dry)
2. glue your triangles on the top portion of the roll (this should look like an opened beak
3. glue wings on side of roll and fold to look like they are flapped open
4. glue eyes on side under one of the beak triangles (allow to dry)

The idea is for it to look like a baby bird with  its head back and mouth opened. 


The next day for snack I pulled these little birds out and told them we needed to feed the baby birds too. I was inspired by My Nearest and Dearest' "eat like a bird" exercise.

What you need. 

  • small snack (nuts, dried fruit,) something they can pinch. 
  • baby bird (from craft above) 
  • a plate to catch food underneath
  • tweezers or tongs
I had the boys pick up one berry at a time using the tongs and "feed" the baby. Wolf had a hard time with the tongs so we opted for him to use his hands. The tongs we used were a little big but Bear seemed to get the hang of it. We also tried using a pair of fine point tweezers. If I had to do this again I would have wished we had kid plastic tweezers. But it worked with what we had on hand. 

After filling  the baby birds belly we lifted up the bird and enjoyed the snack ourselves. Now the boys can't stop talking about the babies being hungry again. Looks like we may have to give this another go soon.


Friday, September 13, 2013

Easy DIY family puppets


Dramatic Play is a fun way to reinforce lessons you have taught your kids. I recently found this tutorial via  The Pink Doormat on Cardboard Finger Puppets. I loved how simple and cute these looked. The original post has you cut circles so you place your fingers through the holes to make legs. I decided  to skip  this step mainly out of impatience but also I thought popsicle sticks would be easier for little toddler hands to grab.

What you need

  • cereal box
  • colored pencils, markers, anything to color your characters 
  • scissors
  • popsicle sticks 
  • tape 
Draw and color all your characters, I used our family members. Cut out your puppets and tape the popsicle sticks to the back. Ta-da!!! Easy right? 

Thursday, September 12, 2013

Karen Katz 'No Hitting' inspired art


Since our core subject this month is family it felt like a perfect opportunity to talk about behavior and how we should treat our friends and family. We were gifted the Little Dos & Don'ts: A Gift Box Set written by Karen Katz and I especially loved her 'No Hitting' book . It's basically a story about kids who are upset and giving them alternatives to take our their frustration.

This felt just right with a very determined, temperamental three year old that I have had on my hands.

Supplies:
Book: No Hitting by Karen Katz
clay (we used air dry but really any mushy sensory clay would work)

We read the book and talked about things that make us upset and what are ways to let me know that he is upset instead of hitting, pushing, or yelling at someone. In the book the example of playing with clay was given so that is what we did. I set out a small ball of clay in front of them and let them explore it when it was dry. After a few minutes I poured some water on it and let them explore it wet. Once done I set their creations to dry and will later go back and let them paint it.

It was a simple way to explain different ways to let out frustration and something I have been referencing back to over the last few days that has really seemed to help. I am looking forward to using the other two books in the set in a similar fashion as well.

**note Mr. Rogers has a three part episode series about just this. Finding different ways to let out your anger, it has been a wonderful addition to this lesson**

Tuesday, September 10, 2013

Our first months curriculum


I finally have had enough time to sit down and actually write this out. This first month was planned out with my MIL. It's basically a customized version of Hubbard's Cupboards monthly curriculum for 2's and 3's. If you haven't been to Hubbard's Cupboard you should check it out. It has monthly themes and bible verses that correspond for the whole year and it goes up to K. It's loaded with fun ideas and a well written calender plan if you don't know where to start.

 I loved that each months theme was based on a few verses and gave me a great starting point but my MIL suggested an all encompassing theme that may continue on for a few month. For that I chose Eric Carle. I love his art and he has so many books I am sure I will be able to plug in any monthly theme and find some Eric Carle book that can correspond to it. I also knew I wanted to incorporate animals some how being that Wolf LOVES them. Just as I suspected Eric Carle has just the perfect book "Does a Kangaroo Have a Mother" tied the whole thing up with a pretty little bow.

I  made this infograph because I am more visual and if i tried to explain it all in text I am afraid I would be too wordy and lose a few of you in the process. So here is our September curriculum in a nut shell. Some things may change and get adjusted based  on the boys interest and how fast they are picking things up, but that is the great thing about homeschool, especially at this age if something isn't working try something else.

I have added a few books  that work in the backbone of the plan but I will also be reading other books and planning activities based on them. Those books will be posted in my regular post.


Sunday, September 8, 2013

Brown Bear {color of the week}


 Our first week of homeschool is under our belt and now I get to share a few of our ideas here.

Bear already knows most of his colors but little brother still hasn't mastered them just yet. So we thought a great way to tie that into our lessons would be through one of his favorite books Brown Bear, Brown Bear, What Do You See?. After reading the book during circle time ( I got these class Brown Bear cutouts that I will rotate out each week to go with the color emphasized) we went over to the table and started our art project.

I wanted to show the boys and Eric Carle inspired technique.

What we used:

  • brown paper bag
  • plastic forks 
  • textured stamps 
  • brown and white paint
I added a little white paint for more of a textured look.

I put a good sized dollop of brown paint in the center of the paper and tiny amount of white in the center and let the boys go only telling them to use those tools to paint. No other directions were given. Wolf loved scratching the paint with the fork while Bear decided that he wanted his painting  "smooth" and ended up rubbing it flat with his hand.We let it dry and I later cut it into the shape of a bear. We will be using different mediums each week with each animal until we have the whole story completed and the boys will have a homemade book of their own.

And of course brown bear day ended with a brown bear snack. The original recipe is here but I skipped the cinnamon and sugar and just buttered the toast and used almond butter to stick the banana slices and raisins to it.  The boys loved it. Now to think of something to do for next weeks Red Bird theme.

**linking to the Virtual Book Club for Kids **

Thursday, September 5, 2013

On homeschooling


^^how they felt about their first day at school^^
             ^^ don't let these pictures fool you. They were upset that I made them stop to take pictures^^


It's official. We have crossed over and started school here at home. With Bear turning three it felt like the perfect time to start something a little more structured. We have always done learning activities at home but having a bigger plan this year felt appropriate. Most importantly for me to get use to the flow and see if this is something that works for our family in the years to come.

Thinking of homeschooling for preschool was an easy decision for both husband and I. For one, we truly believe keeping our children near us in the early years of their life is beneficial, but also monetarily preschool is just plain out of our budget. Thinking of homeschooling during the core years of education is something we want to make sure works for all of us. So this stage felt even better knowing that we would all have the time to work out the kinks and see what best suites our family.

Learning through play is the back bone of the "curriculum" and a philosophy that I really love. Having the ability to get up and explore and have the boys learn through experiences is one of top priorities but of course there  will still be cheesy crafts, fun books and fun play ideas.

I look forward to sharing our progress, as well as some hurdles.And as always some fun ideas that I hope inspire you to teach your children at home as well. Here's to an exciting year ahead!